Quick Tips from Our Presenters
Efficiency, productivity, and quality are obsessions with us at CreativePro Week: An Online Event. The conference is just a couple weeks away, and we can’t wait to share all our amazing tips and tricks with you. With 80+ sessions from 40+ world-class experts, there’s no better way to master your InDesign, Photoshop, Illustrator, Acrobat, and PowerPoint skills!
Here are a few must-know tips from CreativePro Week speakers so you can get an idea of what we have to offer:

Jesús Ramirez
Photoshop
Precise and Fast Scrolling With Input Boxes
You can work faster when you use “scrubby sliders”: Just place your cursor over the label next to any number field in a panel and drag to the left or right.
But wait, there’s more: By holding down the Alt (Mac: Option) key while dragging it, you will change the numeric values at 0.1x speed allowing you to be very precise. If you hold down the Shift key as you scroll the amount will change at 10x speed.
Click here to see more about Jesús and his sessions at CreativePro Week

Anne-Marie Concepción
InDesign
Apply Captions to All Graphics at Once
The Live Captions feature of InDesign is a great way to pull data from an image and place it in a text frame. You can expose file name, description, author, and over a dozen other options.
First you need to choose Object > Captions > Caption Setup. Then you need to create the caption, with either Generate Live Caption or Generate Static Caption. (Remember static captions can break across lines, but currently live captions cannot. However, live captions can update automatically when the image changes.)
But what if you want to apply captions to many pages of images at once? You can either apply the captions one page or spread at a time, or—here’s the tip!—use the Links panel. Yes, you can select the images in the Links panel and add the captions from there.
Click here to see more about Anne-Marie and her sessions at CreativePro Week

Laura Coyle
Illustrator
Appearance Panel Transform Effect
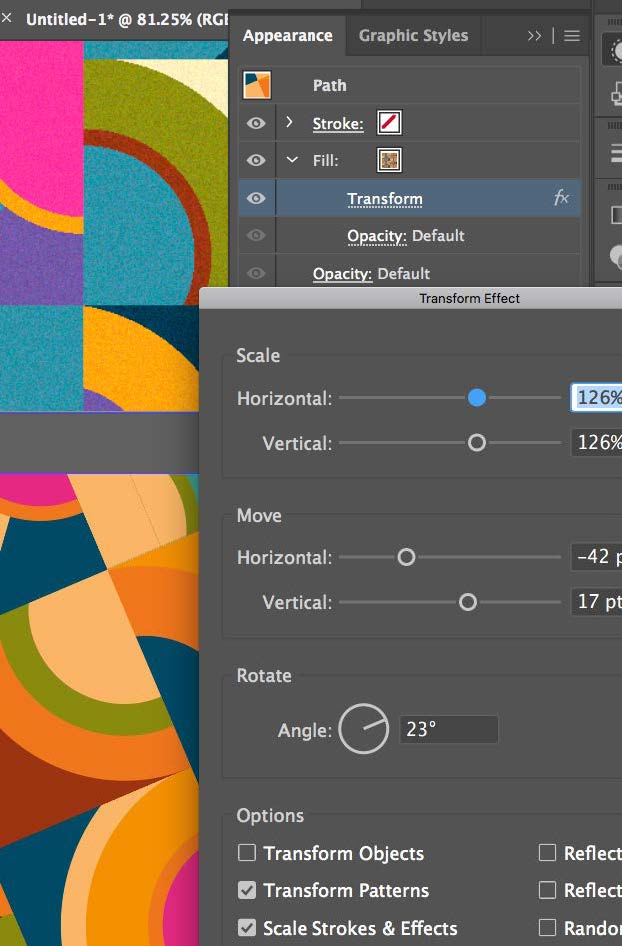 Instead of transforming pattern fill swatches in Pattern Mode, use a Transform Effect on a pattern fill in the Appearance panel, to rotate, scale and move the repeat. Choose fx > Distort & Transform > Transform…
Just like the Transform Each dialog, (Object > Transform > Transform Each) but this effect is live, so it can be continually updated and tweaked as your project progresses.
Click here to see more about Laura and her sessions at CreativePro Week

Jole Simmons
PowerPoint
Animate an Anagram with Morph
 One of my favorite little tricks using morph is to animate anagrams, which are words that can be formed by rearranging letters of another word. Look up lists of anagrams and find two that are opposite. Like “Listen” and “Silent.” Let’s figure out how to animate this using Morph.
- First, type your first word on a slide, then duplicate that slide.
- Type your new word using all of the same letters on the second slide.
- Set your transition to “Morph”
- Click on the text box and for effect options, set it to “Characters.”
- Now when we play our slide, our letters shift to make a new word. When paired with good imagery, you can create something awesome.
Click here to see more about Jole and his sessions at CreativePro Week

David Blatner
Acrobat
Convert Text to Outlines the Easy Way
 Have you ever been asked to submit a PDF to a printer with all the fonts converted to outlines? Don’t convert the text in InDesign. Instead, use this trick:
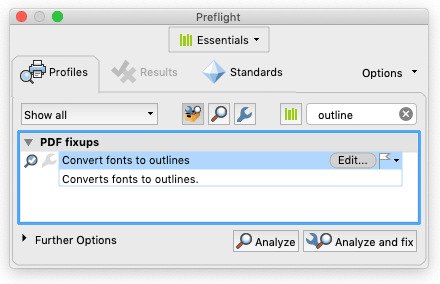
- Open the PDF in Acrobat
- Use Acrobat’s search field to find and open the Preflight panel
- Type “outline” in the search field inside the Preflight panel
- You’ll see a “fixup” called Convert Fonts to Outlines appear. Double-click it.
- Acrobat will ask you where to save your file
That’s it! All your text will be converted to outlines.
Click here to see more about David and his sessions at CreativePro Week